I’m the queen of obsessive-compulsive organization, so hold onto your hats! My way may seem like overkill, but I can guarantee you that you will never lose another file AND you will never forget WHERE in the workflow process you are with a client.
When you first start into photography, you don’t realize how quickly gigs of storage space will be eaten up by files. The sheer number of files become overwhelming and lack of any kind of organizational system from the beginning will only lead to problems at some point in time. It’s best to get control of that in the beginning. AND it only makes sense to follow an organizational system that ties in nicely with your workflow.
DO NOT save your photo files on your desktop. ALWAYS keep the main copy in an external hard drive and then back them up to an additional external hard drive. At some point down the road, you may wish to transfer the files off the hard drive and onto DVD’s, but frankly, it’s a pain in the rear and takes up a bunch of time, so I’d be inclined to unplug those two hard drives from your system, label them both and put one in an office storage area and deliver the 2nd to an offsite storage area. Fire-proof storage is a must for at least one of these.
I’m going to explain MY organizational system to you. I’m not saying that this will be perfect for you or anyone else, but it’s a good place to start that you can tweak to suit your needs if you are currently without a system. If you have a system, but it’s not working that well, then maybe this will give you some ideas.
First off – I have one external hard drive for each calendar year. With the falling price of external storage, there’s no reason you can’t follow this system as well.
Each hard drive has 2 folders on it, for example, this year’s drive has:
2011 Digital Files
2011 Client Files
In this article, I will be discussing the 2011 Digital Files folder, only.
In this files, there are 12 sub folders, one for each month. I sort everything by date. Each client has physical file folder, which is filed in my file cabinet by alphabetical order, and on the outside of the folder is noted the session date, so if I get into a situation where I have more than one session per year with the same client, I can easily find the master digital files for that session by checking my notes written on the file folder.
If you do not sort by date, don’t fear, you don’t have to change the way you do things, keep reading, because the rest of the system WILL work for you no matter which way you use it.
I use the Adobe Bridge default date naming scheme when downloading files, so my folder title looks like this: YYYYMMDD when the files finish downloading from Bride and then I append the client’s name to the file so that it looks like this: YYYYMMDD_LastName_FirstName
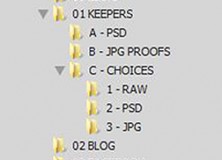
Here is what the folder looks like fully uncollapsed. I will explain each folder below.

After I upload the files to my hard drive via Bridge and Bridge makes the default file folder, I add the client name to the end of it.
Then I copy my RAW master copy (with all of the sub folders) into the client folder.
I move all of the RAW files from the main client folder into the RAW folder so that the main folder is clean and only has sub folders beneath it.
I then switch to the RAW folder and do my white balance synchronization through Adobe Raw. I always do this first, before I touch any files.
At this point, I’m eager to look through the files and see what I got and if any of the special shots I did worked out like I hoped. I always wind up playing around with a few files before I get to down to business. SO – after I get done messing around – I select all files created during this phase and move them into the 00 EDITS folder.
Back in the RAW folder, I cull down the shots to whatever number of proofs I have decided to give the clients. I select these shots using the LABEL feature of Adobe Bridge. When I have narrowed the files down to my final choices, I copy them into the 01 KEEPERS folder.
In the 01 KEEPERS folder, I:
Batch rename the files to either PROOF_XX or LASTNAME_XX (XX = consecutive 2 digit renumbering).
Do brightness, contrast, saturation tweaks & cropping in Adobe Raw
After all tweaks have been done, I do a batch processing, applying an action that I designed that duplicates the layer in Photoshop, adds Portraiture to the 2nd layer, then drops the opacity on that layer down to 50%. These files are saved in PSD format in the A – PSD folder
In the A – PSD folder, I apply a batch process to save the files in JPG format at a maximum size of 1000 x 1000 pixels for uploading to an online gallery or 1500 x 1500 pixels for printing as 4×5 proofs (I crop to 4×5 format for proofing). I save these proof files to the B – JPG PROOFS folder.
At this point, the files are culled down and the proofs are done. They should be uploaded to a gallery or physical proofs should be ordered from your lab. If you do other types of proofing, adjust the sizes to fit your needs and save them in this same B – JPG PROOFS folder.
The next thing I do is format a few favorites for use on my blog. I use special borders and watermarks on my blog uploads. I save the final files in the 02 BLOG folder and upload to the blog.
Then, I format 1 or 2 sneak peeks for Facebook, add my watermark and save them to the 03 FACEBOOK folder. Then I upload them to Facebook and tag them as appropriate.
At some point in time, I will do a slide show for select clients. The IMAGES for the slide show go in 04 SLIDESHOW FILES. The slide show itself will go in the 2011 Client Files area. The ONLY thing that goes in the Digital Files section are images.
When ever the client makes their pose choices for their order, those RAW files get copied into the 01 – KEEPERS / C – CHOICES / 1 – RAW folder. Full retouching is done to the files and saved as PSD in the 2 – PSD folder and final JPGs for ordering are rendered into the 3 – JPG folder.
If the client purchases story boards, albums or other designs that are not straight images, those files go in the 05 DESIGNS folder.
If at any time, the client needs a re-order or needs to order from a proof that they had not previously ordered from, you will easily be able to locate the files and take care of their requests.
Stay tuned, I’ll be back to talk about the Client Files area in the future.