
 In addition to getting photographers away from shooting on Auto – I’d also like to shoo them away from the “auto” setting on their white balance section of the camera menu. I know it’s tempting to just put the camera on auto everything and go for it – but that’s how non-professionals do it and you’re better than that.
It’s the butt crack of winter where I’m at, but it’s almost Valentine’s Day and that means people will be getting engaged and that means people will be getting married and that means you will be shooting weddings. And that means you will be ordering yourself a calibration target and getting a handle on custom white balance. Or else. No, I don’t know “or else what?” this isn’t the time to mess with me. Just do it.
Once upon a time, I wrote a blog post encouraging potential wedding clients to ask about white balance when interviewing potential photographers. Of course, I hoped they pick me, but if they didn’t at least they had some help in discerning what good wedding photography looks like.
Isn’t it sad that I had to do that? Shouldn’t ALL wedding photographers be professional enough to know and use custom white balance? If you’re feeling a little embarrassed right now because you don’t employ CWB methods or don’t even know what I’m talking about, tuck those feelings aside, know you’re not the only one and move onto using CWB methods. OK? It’s all good.
So, anyway, wedding season also comes with brides who decide they must look tanned on their wedding day. It’s rare to find a bride that does this that actually looks tan. Usually their skin tones border on orange. And that is made worse by the greenish-yellow cast from the fluorescent lights in most churches. No “auto” setting on a camera is going to render the images correctly, so it’s up to you to figure out how to fix them. And for heavens sake FIX THEM! Brides DO notice these things and will complain, or else they will call someone like me, crying about their ruined photos and ask how much I would charge to fix them.
Bear in mind, that this is also a HUGE issue for natural light photographers, not just wedding photographers. Weddings are the only non-studio shooting that I do, so I am using weddings as an example, however, this skill is applicable across the board. You will want to custom white balance for ANY shoot you do, even studio work.
So – here’s a set of photos to illustrate the problem, the solution and the fix:
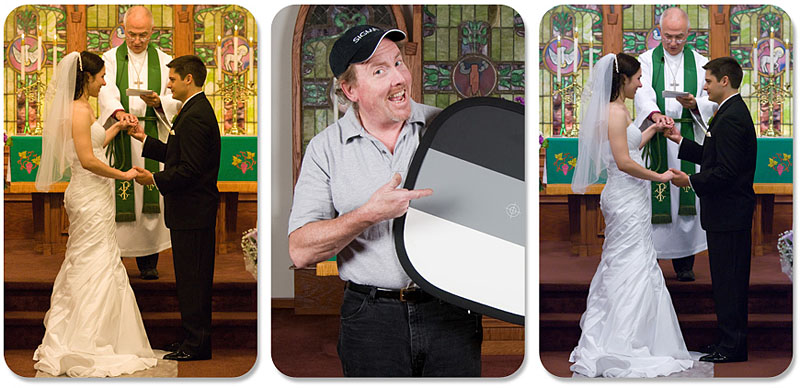
The photo on the left shows the shot when using the “Auto” White Balance setting on the camera. The middle photo shows my big dude wedding assistant/second shooter with the calibration target (a la Vanna White) and the third photo shows the shot corrected for custom white balance after using the calibration target. See the difference?
Long before the ceremony begins, I go into the church, set this target where the bride and groom will be standing (so that the light hitting the target will be the same as the light hitting the bride and groom) and I snap an image. With EACH camera that I plan on using. Later, during post processing, I synchronize all the images taken in the church with that camera – using the target image to set the white balance and then copying the settings over to all the other images taken by that camera. If that part is confusing – don’t flip out, I’ll be doing a step-by-step tutorial tomorrow.
So, your first assignment is to buy yourself a calibration target. Or ANY white balancing tool. I use the 24″ Photovision target, but there are also other tools out there. There are also smaller calibration targets than the one I’m using. I ordered a smaller one, but the supplier was out and they upgraded me to a larger size. Which was nice, but sometimes it’s a bit big, even though it does collapse down – it’s one of those springy collapsible things that were invented to drive photographers crazy until they figure out how to fold them, yet I digress…
Here are some links to the type I use. Avail yourself of one and then start shooting an image of it with every session. If you start the session in the shade and later move into the sun – shoot two different ones. The secret here is to shoot a calibration image every single time your lighting changes. Trust me on this. Your calibration image should be a close-up of just the target and nothing else. Honestly, I have no clue why – I’ve been told that and it works, although I’ve seen photographers include the surroundings, or even the client holding the target and they don’t seem to have issues. I’m just a rule-follower and that’s the rule I was given, so…
Come back tomorrow when I will walk you through how to synchronize the white balance in your final images.
did I miss it? you say : Come back tomorrow when I will walk you through how to synchronize the white balance in your final images.
where is this blog? its tomorrow now? 🙂
Nope, you didn’t miss it – My mouth wrote a check that my rear-end couldn’t cover. A bit behind schedule – check back Friday. So sorry!