Custom White Balance is Your Friend – Part 2 How to Synchronize CWB in Adobe RAW

Wootness190Finally! Yes, I know. This was promised last week & I’m just now getting to it. Well, Wootness doesn’t pay my check, my clients do and I was taking care of them. So sue me.

Anyway… I said that I would come back and tell you how to USE those calibration shots that I say you should take. What better way than to link you to the video tutorial that I learned from.

Sidebar: Part of me is being lazy. I don’t really want to sit down and do a tutorial for this. Other people have already done it. Part of me is also being respectful. I do my process the exact same way I was taught by someone else. No need for me to regurgitate it back to you so you think I’m the next best thing to sliced bread. Learn from Travis, he is – at least out in his neck of the Idaho woods.

Back when I first viewed this video. it was hosted at a forum run by Silverlake Photo Accessories. The voice in the video is Travis Gadsby, owner of Silverlake and fearless forum leader until just recently.

The video is now hosted by a photography forum called Jeff Lubin’s Success Forum. You will need to become a member there to view the video’s original thread. However, the forum is free and you can sync it with your Facebook account, so sign up is pretty easy.The forum is now run by Mr Lubin and seems to be a growing community of talent. Check it out while you’re there. 🙂 Tell ’em Wootness sent ya!

OK – and now for the link to the video: CLICK HERE to view the forum thread. Or click here to go straight to the video: Synchronizing CWB in Adobe Raw


Yours is Bigger Than Mine. I’m Fine with That.

Image: piyaphantawong / FreeDigitalPhotos.netSome people just can’t get past the whole gear thing. For a long time, I was tempted to do as a friend of mine does – cover up all the identifying marks on my camera with black electrical tape. You’d know I shot a Nikon, but that’s about it. For the past few years I’ve side-stepped questions about what camera body I shoot with. Well, the cat is about to be let out of the bag. The cameras I’ve been shooting with for the past 5 years have been Nikon D80s. <— plural of D80, and don’t try to put an apostrophe after the zero to make it plural, it doesn’t work that way.

Go ahead, I’ll pause while you laugh. And then I’ll laugh when you get all bug-eyed when I tell you I just earned a Master’s Degree from the PPA with every single image being made with a D80. The D80 was not manufactured after 2008. But, when I purchased them, they were $1000+ each and that’s not a small amount of money. I wrestled with upgrading, I wrestled with the price. And I wrestled with whether I really NEEDED a new camera. Or two. Because I constantly shoot with more than one camera at a time, I like my main bodies to match, so I upgrade both at once. Backups, not so much. They’re a backup for a reason.

It’s really easy to get all caught up in the hype over the new models and think you need the latest and greatest. If you really do need it, then that’s great, obviously you’ve reviewed your needs and compared it against the equipment you already have and the equipment available at the trade show you just attended. Oops, I mean, the equipment your favorite supplier carries.

For example – The D700 has been on my wish list for awhile. Mainly because it has better high ISO / low light handling capabilities. But, there’s been a couple of newer models hat have come out since I placed the D700 on the list, and honestly, my low light work has decreased significantly, so the need is not as great right now as it was before.

Maybe I’m more cautious because I’m older. Maybe I’m just more greedy with my money. Whatever the reason, I find the constant search for the holy grail of gear to be disconcerting. Your clients don’t care what gear you use. Your clients care that you deliver a quality product and the driving force behind that is your knowledge and skill level. Of course, if you’re shooting with a pinhole camera made out of a milk carton and duct tape, we’ll need to chat, but for the most part, I think everyone is operating with a decent camera body capable of capturing excellent images when used correctly. Even if it’s a Canon. 😉

For further reading, please review these past Wootness articles:

Don’t be a Gear Hound!

My Camera is Better than Your Camera. Not!

Custom White Balance is Your Friend

Wootness106 In addition to getting photographers away from shooting on Auto – I’d also like to shoo them away from the “auto” setting on their white balance section of the camera menu. I know it’s tempting to just put the camera on auto everything and go for it – but that’s how non-professionals do it and you’re better than that.

It’s the butt crack of winter where I’m at, but it’s almost Valentine’s Day and that means people will be getting engaged and that means people will be getting married and that means you will be shooting weddings. And that means you will be ordering yourself a calibration target and getting a handle on custom white balance. Or else. No, I don’t know “or else what?” this isn’t the time to mess with me. Just do it.

Once upon a time, I wrote a blog post encouraging potential wedding clients to ask about white balance when interviewing potential photographers. Of course, I hoped they pick me, but if they didn’t at least they had some help in discerning what good wedding photography looks like.

Isn’t it sad that I had to do that? Shouldn’t ALL wedding photographers be professional enough to know and use  custom white balance? If you’re feeling a little embarrassed right now because you don’t employ CWB methods or don’t even know what I’m talking about, tuck those feelings aside, know you’re not the only one and move onto using CWB methods. OK? It’s all good.

So, anyway, wedding season also comes with brides who decide they must look tanned on their wedding day. It’s rare to find a bride that does this that actually looks tan. Usually their skin tones border on orange. And that is made worse by the greenish-yellow cast from the fluorescent lights in most churches. No “auto” setting on a camera is going to render the images correctly, so it’s up to you to figure out how to fix them. And for heavens sake FIX THEM! Brides DO notice these things and will complain, or else they will call someone like me, crying about their ruined photos and ask how much I would charge to fix them.

Bear in mind, that this is also a HUGE issue for natural light photographers, not just wedding photographers. Weddings are the only non-studio shooting that I do, so I am using weddings as an example, however, this skill is applicable across the board. You will want to custom white balance for ANY shoot you do, even studio work.

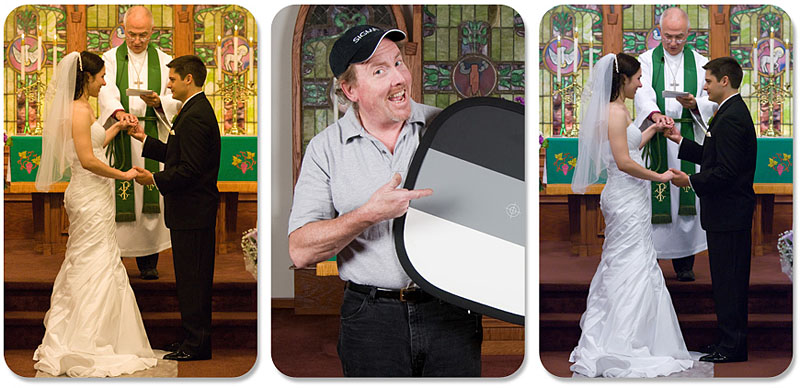
So – here’s a set of photos to illustrate the problem, the solution and the fix:
calibration target

The photo on the left shows the shot when using the “Auto” White Balance setting on the camera. The middle photo shows my big dude wedding assistant/second shooter with the calibration target (a la Vanna White) and the third photo shows the shot corrected for custom white balance after using the calibration target. See the difference?

Long before the ceremony begins, I go into the church, set this target where the bride and groom will be standing (so that the light hitting the target will be the same as the light hitting the bride and groom) and I snap an image. With EACH camera that I plan on using. Later, during post processing, I synchronize all the images taken in the church with that camera – using the target image to set the white balance and then copying the settings over to all the other images taken by that camera. If that part is confusing – don’t flip out, I’ll be doing a step-by-step tutorial tomorrow.

So, your first assignment is to buy yourself a calibration target. Or ANY white balancing tool. I use the 24″ Photovision target, but there are also other tools out there. There are also smaller calibration targets than the one I’m using. I ordered a smaller one, but the supplier was out and they upgraded me to a larger size. Which was nice, but sometimes it’s a bit big, even though it does collapse down – it’s one of those springy collapsible things that were invented to drive photographers crazy until they figure out how to fold them, yet I digress…

Here are some links to the type I use. Avail yourself of one and then start shooting an image of it with every session. If you start the session in the shade and later move into the sun – shoot two different ones. The secret here is to shoot a calibration image every single time your lighting changes. Trust me on this. Your calibration image should be a close-up of just the target and nothing else. Honestly, I have no clue why – I’ve been told that and it works, although I’ve seen photographers include the surroundings, or even the client holding the target and they don’t seem to have issues. I’m just a rule-follower and that’s the rule I was given, so…

Come back tomorrow when I will walk you through how to synchronize the white balance in your final images.

About those Shadows: It’s Groundhog Day and Your Name Ain’t Phil

Wootness179Oh good morning Wootness fans! Happy Groundhog Day! Phil did NOT see his shadow, so I guess that means we’ll have an early spring. Yeah, right. When I start relying on a rodent to forecast the weather, there’s issues at play.

So, today we’re gonna talk about shadows. Specifically, shadows from your clients that are cast onto your lovely photographic backgrounds. You SO have learned not to use bedsheets, right? No? Please back up and read THIS first.

OK, the rest of you, listen up. Take a good look at your client portraits. If the client casts a shadow on the background, they are TOO CLOSE to it. I’m not going to dig up an example of this on the internet, because it’s just not nice to use someone’s work as an example of what NOT to do – unless one of you dear readers would like to help out with an example (I’ll keep your name confidential), but anyway – I think we all know if we’re casting shadows or not. Please note that I am referring to shadows on the background behind the client, not shadows on the floor leading away from the client.

I’m telling you – the shadows will give you away as an amateur. There are various reasons as to WHY the shadows appear, and I’m sure that I’ll be hearing some of them in the comments shortly – but here’s the deal. Either you didn’t know that you should put your clients at least 6-8 feet in front of the background OR you know it and don’t care because you just don’t have that much room in front of your backgrounds to work with. So – to the former – I’m telling you to pull your clients out 6-8 feet (experiment with that, but that’s a general measurement to get you started) and to the latter – suck it up – if you don’t have the room to shoot with technical excellence, you need to find somewhere else to shoot. Do not force the issue and continue to churn out work with shadowy backgrounds because you’ve got your studio set up in the corner of your house or you made a bad decision to rent/lease/buy a space too small for your needs.

You can’t deliver quality work without the proper tools. You not only need to have the right camera, lenses, lights, triggers, modifiers, etc, but you must also have the right SPACE.

If you just can’t change the space you’re working with, you need to change the type of things you shoot. Ditch the full body family groups and stick to heads and shoulders only. By not insisting on the amount of room needed between you and the client for full(er) body images, you can pull your clients away from the background and closer to you and stick to head/shoulders/upper body shots.

Working within your limits, skill-wise, equipment-wise and space-wise is the mark of a professional or at least an aspiring professional. Please stop trying to do work that you are not fully prepared to do. The RIGHT way.

Oh, the people you meet…

DSC_0110b-web2

Thank you Dr. Suess for that phrase. If you’re not familiar with it, it’s from one of the books that is popular to give kids when they’ve graduated from high school. It talks about the things you will do and the people you will meet as you start your new phase of life.

Being a photographer, or probably any occupation for that matter, photographers seem to think they have the edge on unique-ness, but I doubt that’s really the case – ANY WAY – we meet a lot of people. Some of them are strange rangers, most of them are fairly run-of-the-mill and sometimes, well sometimes you’re just blown out of the water.

Meet Brian and Lisa of Leavell Photography & Cinema, LLC. Most of my friends and colleagues will know who these two are if I say “These are those CPPs that passed the image submission with off-camera flash!” Yes, I’m impressed and I’ve talked about them THAT much.

I’m a CPP liaison (which means I help folks that are trying to achieve the Certified Professional Photographer designation and offer the certification exams in my state for the candidates) and I’m always interested in meeting photographers who have achieved this designation.

Brian and Lisa came to a class I was teaching and in the midst of introductions, they mentioned they were CPP’s. Upon further questioning, it became apparent that they did not own a studio. Or studio lights. I’m aware that the image submission and exam are hard to pass without studio experience and was impressed. I was even further impressed when they told me their image submissions were done using off-camera flash. Yes, kids, these two figured out how to do 3:1 ratios with off-camera flash.

That takes spunk. And a LOT of work. And drive and perseverance. All I can give them is a “High Wootness Five!” for their efforts and my enduring respect for their hard work. I’ve worked with a lot of CPP candidates, but these guys take the cake on drive and motivation.

So, if you’re from PA or the Pittsburgh area, look these two up. They’ve recently taken leadership roles in the Pittsburgh PUG and I know they will be happy to network with you.

But, Seriously: Just buy a light meter, will ya?

lightmeterWhen I teach classes to new photographers, I have a “learn with what you already own” philosophy. I know how it is. You excitedly take your camera, bag and manual to the first class that will get you on the road to becoming a pro photographer and you’re suddenly faced with an excruciatingly long list of equipment you need with a grand total similar to the national debt. So, I try not to do that to beginners. But I do teach and mentor on an advanced level to photographers that desire to do studio lighting and involve themselves with advanced concepts – and when you get to that point, you just have to suck it up and start investing in some basic equipment. Enter the light meter.

Those who know me, know that I have a “thing” for light meters. Those who mentor with me know that they must own and learn to use a light meter or I cannot mentor them. *sigh* yes, I am THAT person. The person that tells you that you can’t eyeball light. I don’t have tolerance for deviation from the ownership of a light meter. If you want to set up studio lights and keep fiddling with them until it looks right on the back of your camera, you go right ahead. Just don’t ask me for help. And please don’t teach a class in studio lighting, you’re only promoting bad habits.

I will admit that natural light specialists can probably get away with not owning one as long as they have learned how to use their in-camera light meter fully (as in, bust out that manual, baby, because you’re gonna be memorizing the section on the in-camera light meter) . But as far as studio lighting goes, a light meter is a must.

If you intend on learning ratios, and most of the mentorees I work with intend on learning this for the CPP exam – the exam and image submission REQUIRE 3:1 ratio images as part of the certification process – you cannot learn lighting ratios without a light meter. Yes, you can learn to calculate what the settings SHOULD be without one, but you can’t accurately adjust your studio lights to the proper ratios without a light meter.

There’s a huge difference between saying “A 3:1 ratio in studio photography can be accomplished by setting the main and fill with a 1 1/2  stop difference between them” and actually being able to set the lights correctly. Seriously, you can’t fake it, stop trying.

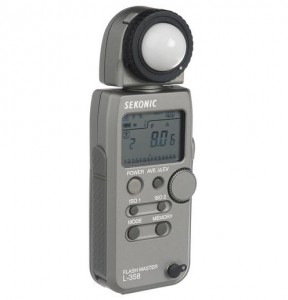
If nothing in this article made any sense at all – I recommend you pony up the money for a light meter (the one pictured is ~$309) and make that your next educational goal. No, the light meter is not the sexiest piece of equipment you will ever buy, but it will be one of the MAIN influences in the technical excellence of your images.

New Year’s Resolution 2013

Recently, an email hit my inbox, featuring a set of  Photoshop actions that emulated Instagram effects.

Oh for the love of all that is holy, is this what we’ve been reduced to?

We’ve become such an instant-gratification oriented society… my own timeline is filled with more cell phone photos than you can shake a stick at. And most of them are not very good – snapshots, if you will. And some of them were done through Instagram. With effects.

Because I’ve become lazy. Because it’s easier to whip out the cell phone that is usually stuck in my back pocket than it is to constantly carry a big-girl camera. Funny story – I entered a cell phone photo in an image competition and scored a 79. It’s probably the 79 I’m most embarrassed about.

Yet, I digress.

Back to laziness…. I’ve let myself go, photographically speaking. I think I should change that. I’ve worked very hard to refine the skills that I have, yet I fail to exercise that talent on a regular basis with the best tools I own.

So – my resolution for 2013 is to stop using my cell phone camera.

Anyone want to join in?

Let’s talk about lab loyalty…

Proof border samples from Buckeye Professional Imaging

In the beginning, when the ink was still fresh on my business license, I used whatever lab was running a sale. I hadn’t yet run into quality, delivery or customer service issues. I was a happy little photographer bouncing from vendor to vendor, collecting my paper samples from each and keeping up with the constant barrage of sale emails in order to make sure I was ordering from the cheapest place.

Gradually I began to learn the minute details that set each lab apart.

Some had lousy customer service, some had cheaper 8x10s, but more expensive 16x20s. Some shipped Fedex, some UPS, and some USPS which meant I had to remember what days of the week each delivered and whether or not the delivery dude had the sense to tuck my delivery in the dry area of the front porch if I wasn’t home and the weather sucked.

Keeping up with the sales became time consuming and tedious and I found myself holding onto orders if there was no sale because I knew another one would come along shortly.

I didn’t have a solid, organized system, and at the end of the year, the accounting paperwork was a nightmare. I think I used 14 different labs my first year in business. My Quickbooks program couldn’t keep track of the constantly fluctuating COGs to my satisfaction. Suddenly, all the savings from bouncing around was eaten up by the administrative time spent on tracking the sales, learning everyone’s ordering system and trying to reconcile the accounting system.

Eventually I settled on one lab. And the reason was stupid. Because they had the quickest delivery. Suddenly my work flow slowed down to where I was ordering my items the day before they were promised. I knew they’d arrive the next day, so what was the problem?

The problem was that I was using a lab that enabled a downturn in my own customer service. I found myself scrambling at the last minute to do retouching and ordering when I should have had everything squared away at least a week earlier.

And then I began to think… I get angry when I see clients bounce from photographer to photographer, chasing the latest sale. I moan about the fact that there does not seem to be any customer loyalty these days. And then I stopped and thought about what I was doing. And I felt like a hypocrite.

So, I began a new search. I started all over. I’m in the middle of re-branding my studio and changing over my pricing, packages and product line to be more in line with that of a boutique studio (is that an over-used phrase, or what?) and a new system is required.

And I began to think again. About small businesses and local businesses. And how in this day and age, loyalty is important in an economy that’s about as supportive as my ex-husband. 😉

And suddenly the choice was clear. I have chosen my new lab based on the qualities that I hope my clients look for in me. I’m local. I offer personalized customer service. I’m not high volume, so I have the opportunity to spend time with my clients and offer them a much higher level of service than they would expect from a chain. My prices are a little higher than most photographers in my area for those very reasons, so the fact that the labs with those desired features had a little higher COGs was only to be expected.

I have chosen Buckeye Professional Imaging to be my primary lab. It is located in Canton, Ohio (just up the road) and I have been acquainted with the owner and a few of his staff for several years. I belong to an organization that uses Buckeye for all of their printing needs (and those needs are numerous), so I’ve had many opportunities to be impressed with their product line and high customer service. I’m very pleased to know that the person on the other end of the line has a familiar name and face.

I encourage you to re-evaluate WHY you use the lab you do. Perhaps everything is going swell and no change is needed, but it could be that there are better options out there for you. I especially encourage you to look to your local community and see what your options are closer to home.  This is truly a time when supporting your local business is important.

If you’ve not yet decided on a lab – check out Buckeye and order some FREE test prints at this link and tell them Wootness sent ya!

Disclaimer: Christine only recommends vendors based on personal experience and does not accept compensation of any type for a positive review or recommendation.

What’s Up with Wootness?

Well, hello!

First of all – I’m BACK! But, what I intend on doing from this point forward, is yet undecided.

Wootness was born in September 2011. Not because it was needed, not because it was my main focus. But because I made the decision to leave my studio temporarily and help care for an elderly and ill member of my family.  I was no longer in the comfort of  my office during the day, but offsite with a laptop and some odd chunks of time on my hands. Time that I used to channel into writing, commentary and humor. Time that I used to shield myself from the sadness and illness around me and lose myself in a brand of humor that sometimes I only understood.

The temporary measure to care for one person, turned into a 14 month stint to help care for two people until both of their deaths.

There came a time, when lengthy articles requiring illustrations and research were no longer possible and the only humor I could muster up were one-liners that were incorporated into cartoons. Oh the cartoons. Some of you hated them. Suck it up and know that I was probably *this* close to puddling heap and needed the Wootness laugh break to keep me going.

At times, Wootness helped me cope through some tough times. And when the times got so tough, that I could no longer wrestle a snarky comment from my soul – I abandoned Wootness, knowing that it would be there to work on when I was able to write, again.

There were times when I cursed the day I decided to start Wootness. Sometimes, the hate mail and rude personal comments were more than I could bear, and my little website only added to my grief instead of helped relieve it. I tried to stay unaffected by it, but I must admit to finally learning to freely exercise my rights to unfriend, delete and block to help keep the insanity at bay.

My off-site, half-closed studio status is now null and void. With the very recent passing of my dear father-in-law, I now find that all of my time is my own and I’m ready to go back to work full-time. I’m preparing to re-open my studio under a new name and with a new focus. It’s a time of rebirth.

Wootness may or may not return and prosper. I haven’t decided. I’ve received an offer for the content of the site, but Wootness is my baby and shall forever stay here, under my control, even if nothing else is ever added to the site.

Normally, I’d jump right back in, but since this site was born of a need for an outlet that no longer exists for me, I’ve not yet made a final decision.

But I wanted to say “hey!” and give you all a high-Wootness five. 🙂

Christine

Back to Basics – Should you go into business at all?

In 2001, my husband and  I went to Ireland for 9 days. Mealtimes were difficult for me as it was the height of Salmon season and this girl is so NOT a seafood fan. Overall, I wasn’t a fan of Irish food (except for Barmbrack), so when we saw a little hamburger stand open in Doolin, I rushed to get in line.

Obviously, the place was opened with the tourist market in mind. We were there through Easter weekend, which seems to start the “high season” and there was a HUGE influx of tourists the last few days we were there. My fellow American tourists were all missing McDonald’s as much as I was and the place was packed.

It was a small restaurant, no places to sit down, but there were grills, fryers, pop machines and enough other equipment to assure me that I was going to get some tasty eats very soon.

Sadly, I was disappointed. The beef, well, I don’t think it was beef, I think it was some mixture because it didn’t taste a thing like a hamburger. The fries were white and soggy. I believe the fryers were not up to temperature and the fries were not cooked long enough.

I was so disappointed as I chucked most of my lunch into the trash can.

So, what in the heck does this have to do with going into the photography business?

Sometimes, what seems like a good idea, starts to go very badly if not executed correctly.

I’m sure the entrepreneur who decided to open a hamburger stand in one of the biggest tourist areas of Ireland had a brilliant idea. However, I am sure that he/she did not bother checking out what an actual American hamburger and fries meal tasted like or the meal I was given would not have been the norm.

The Irish entrepreneur failed because he did not educate himself. He saw an idea that seemed to be a good money maker (beef and potatoes, how hard can it be?), but he failed to research and educate himself.

He bought all the groovy restaurant equipment that he needed and jumped right into high season.

His friends and family probably all encouraged him and told him how great his meals were. Well, they weren’t exactly hamburger experts, either, were they?

Does that sound familiar?

It could be that you’ve bought a new camera and you are loving all of your photos. Your friends are encouraging you to do this professionally. You know, think about staying a hobbiest. Or an amateur. Or if you want to go pro, set a goal to do that – a goal that is several years down the road. Because you need time to develop your skills, take some classes, find out what the market needs in your area are. Do some research. Get some education.

Don’t chuck all of your money into equipment and then jump into business with a half-heated fryer…